Friday, August 27, 2021

Chimney Repairs

Once we returned from the Boundary Waters, we had contractors arrive to repair our failing chimneys.  We have two chimneys, and they were both broken down so much that they were irreparable.  Cracks in mortar and brick allowed water to get into the house (into the breezeway).  So the only option was to tear down and rebuild.

Cracks in the crown allowed water to seep into the underlying cracked mortar and brickwork.


This had been going on for quite awhile judging by the amount of caulk.  I hadn't caulked the chimneys, so it must have been the previous owners from more than 14 years ago.  I think the leaks got worse with time, though.

Demolition started.  This chimney pictured below was torn down to the lowest roof level.

And the big chimney on the other side was 2/3 removed.

It was quite an ordeal, and a very extensive scaffold setup.

Forms were placed on the top to pour a new crown.

They both turned out very well, and I was quite pleased with the brickwork.

The brickwork is complete, and now we have to wait multiple weeks on the flashing crew to make us watertight to the roof.  I'm not too pleased with the temporary silver tape, but this company promised to fix whatever they break.  So if water does cause damage, they'll pay for it.


Thursday, August 26, 2021

Drill Press Challenge

Now that I own a whopping 3 drill presses, I thought I would see how well they perform in accuracy.  This may be a hotly debated topic, but I think of "runout" when I think of accuracy.  That is, how well centered does a cutting tool travel in relation to the center axis of the quill?  I have a dial indicator, so I can find out.

First up is my most recent acquisition - the Walker Turner drill press with a best estimate date of manufacture in the 1940s:

Find the low spot on a straight and solid shaft, zero the indicator, and then manually rotate the belt to rotate the quill to find the high side.  In this case, I'm showing about 0.0045 (four and a half "thou" as in thousandths of an inch).  Not bad.

Next up is my Atlas drill press given to me by my Uncle in Peoria.  I absolutely love this machine:  It's quiet, and smooth, and it has never let me down.  It also has the speed reduction intermediate pulley set for slowing down rotational speed.  Thus, it is a good metal drilling tool.  I believe this machine is 1950s vintage.

Results for the atlast:  0.0125 - about twelve and a half thou.  This is about 3x worse than the Walker Turner machine.  Hmmm.

Now we go way back in time to the granddaddy:  the "Champion Forge & Blower Company" Post Drill.  This is over a century old by now, and my best guess is this was made 1905-1910.  I have a previous post about restoring this post drill.  Let's the test begin:

This was a bit of a challenge to set up with my indicator.  The table is rather small, and the keyless chuck barely fit my 10mm straight shaft.  (I don't think this manufacturer knew what the metric system was 100 years ago)

Results were a bit crazy.  Runout was 0.170.  The needle on my indicator went all the way around and then alot more!  


I thought it would be cool to put a pencil in the chuck, and rotate it to visualize this runout.  It's easier to see this way.


I've read on some machining forums that the 3 jaw chucks in drill presses can wear after alot of use.  I believe that is the case for the Atlas - things appear to have some wear.  For this last drill press with nearly 3/16 of an inch of runout, I think the chuck itself is not centered in the quill.  I don't use it, so I'm not going to bother repairing it.  It's just a nice show piece.

Wednesday, August 25, 2021

Catching Up - BWCA Trip

Wow - 2 months went by in a flash, and I haven't posted a single update.  That's just a sign of the busy times we're in.  Lots going on.

A month ago, we were in the Boundary Waters on this day of the month.  It was a good trip, despite some mechanical challenges getting there and back.  Here's just a few pictures.

After 750 miles of travel, we made it to our entry point of "Homer Lake" on an overcast morning.  We had 3 kids, 6 packs, and 2 canoes.  That's all we were able to manage to take.


#1 Kiddo learned how to portage canoes on this trip.  And she did just great.  Below, here she is portaging our 59 pound Kevlar canoe up and over a pass.  I was quite pleased with her abilities.

Here we are at the end of a portage on our rainy day.  We were loading up as the 2 kids held the boats steady.  Kiddo #3 always strikes a pose for the camera, and he convinced the others to do the same.

We had a neat campsite with a sharp rock "pond" behind the main campsite.  It was a large area of these many split-rock splinters.  Kids enjoyed stacking them up just before bedtime.

Our favorite campsite was our last campsite - a small island in the middle of "South Cone Lake".  It had a little landing to easily launch canoes from, and was the only site on the entire island and lake.  We enjoyed the solitude, and also enjoyed a very friendly squirrel who was a bit mischievous.  

On our way home, we had to paddle a mere 4 miles through the large "Lake Brule".  It was a calm morning and the waves were minimal.  
It was a great trip, and we got this trip in right before the National Forest Service shut down the entire BWCA due to wildfires.  Yes, the entire 2100 square miles of Park Area had to be evacuated (and still is at the time of this writing).  Crazy!


Thursday, June 24, 2021

Walker Turner Drill Press - Restoration Complete

I've been slowly putting the old Walker Turner drill press back together.  It's fun to take it slow and do it right.  I've got the time.

It turned out all very well, and every piece is functional.  


New wiring was a must.  Here I repurposed a couple of cords from a vacuum cleaner.  I added a ground, too.  I'm a big fan of Wago wire nuts instead of traditional wire nuts - it's fool proof.

I installed a link belt.  It supposedly suppresses vibration, but I like it simply because it's easy to install.  And also it's "one size fits all".  I don't have to have stock different belt sizes.


I noticed just now the driven pulley didn't clean up very well.  I'll have to give it a bit of scotch brite to polish it up.

This mechanism lift the entire head of the drill press.  Now that it is degunked, and the post is polished up, it actually works pretty well!

The one missing part will be fabricated (by me):  The quill lock that keeps the quill/spindle assembly down is missing half the lock.  It's an easy piece to make, so I can knock that out  after work hours.

The depth indicator and related depth stop has numbers that are now legible.

I like this old style switch.  It has a real snap to it and feels very positive.

I do not have the X/Y/theta stage restored at this time, but it's on my list to do.  That will have to happen later this summer.  For now, I've got some other projects bubbling to the top of the priority list.

Side Story:  My lovely wife helped me move this drill press from one workbench to another so I could get some good pictures.  Oh man, this is one heavy heavy piece of equipment.  While we managed to move it with just the two of us, I had some flashes of panic as to if we were going to make it at about step #3 (out of 5 steps total).  After taking pictures, I had Kid #1 and Lovely Wife help me move it back to its final home.  That was the way to go.  I shouldn't underestimate the strength of my daughter.  Lesson learned.


Friday, June 18, 2021

Jumping Ahead - Walker Turner Restoration

 It's been a busy week, but I've managed a little more progress on this old drill press.  Temperatures and humidity have been very good for paint, so you have to make hay while the sun shines.  I think that's how it goes.

I took apart the mechanism that raises and lowers the head of the drill press.  Even though there is 80 years of caked-on goo, it wasn't too difficult to loosen and remove the hardware.


A little time on the wire brush on the bench grinder makes easy work of the grime.

A little paint, and reassembly, and things look and work like new.

I also removed the table from the column, and cleaned it up.  I only painted the underside, and the top will be left raw.  After much wire brushing, it clenaed up very nicely, and I could even see the Blanchard Ground machining marks left behind (unpictured for now)


That left the base with the column.  I tried to remove the column, but it wouldn't budge.  I can work with that, though.

More original color paint on the underside of the base.

Again, more wire brushing, but this time it revealed a patent number in the base.

Masking, wipe down, then paint and cure.  I've been real pleased with how this new Krylon paint sprays, flows, and dries.  

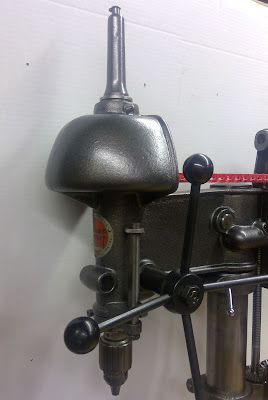
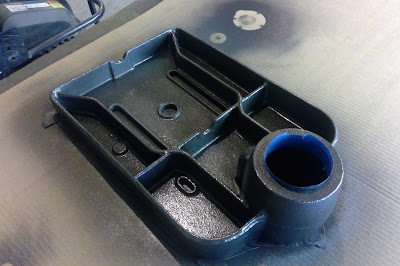
Here is the casting for the head.  It's a pretty neat shape, and it is fun to see all the detail the weird geometries.

I masked all the surfaces that were machined for other parts (spindle, column, cam locks, name plate).

And shot the standard paint on.  It looks brand new.


I hope over the weekend I can start reassembling many of these pieces back together.  It should be a fun puzzle.

Friday, June 11, 2021

Progress on the Drill Press Restoration

 It's been a full and busy week at the house with a full schedule of work and kid activities picking up.  But I was able to sneak away in the late evenings and do a little work on the old drill press.

I tore apart most of the pieces out of the head.  The spindle mechanism and all the related parts came out pretty easily.


There is very little wear (if any) on the up/down rack and pinion of the quill.  It should clean up just fine.

I also removed the gear mechanism the raises/lowers the head.  I'll further disassemble it into its smaller pieces for cleanup/paint.

The head casting still has its bearings in place.  I didn't feel anything wrong with them, so I'll probably keep them in place rather than replace them.  I could feel no grit or hear no odd sounds.

I was able to clean up the motor and get it running better with a new start cap and new bleed-down resistor.  I like the two-tone motor to give it a bit of detail.

I"m not sure how to restore the art-deco name plate.  I'll have to do a little research to see how to do that.  Perhaps I can print or stamp a new one myself.  Hmmm.

The rest of the machine looks pretty sparse with all the components removed.  The table is very stuck.  I've been dousing it with penetrating oil the last few nights.  I'm going to bring forth my secret weapon soon:  the torch.

I clean up all the hardware individually, and give them a light paint job.  I find that if I give nuts and bolts a full dose of paint, it chips and peels off when I reassemble.  So, a light coat is fine knowing that I'll touch it up after reassembly without the hassle of removing chipped paint.

I have a three day weekend coming up, so I hope to get a little more done as time allows.  

Friday, June 4, 2021

The Walker Turner Drill Press

 A week ago, I was able to buy a cool old drill press off Craigslist.  I know, I know.  I already have an old drill press, so what would I do with another old drill press?  Well, I don't really know.  I thought I could justify it by saying, "one for wood and one for metal", but I don't think I need to justify it.  It's just cool.


This was a 1940s Walker Turner drill press that has been handed down through a family.  Purchased new by the grandfather, then passed down to his son, and then to the grandson.  I think it's pretty cool this old machine stayed in one family so long, so now I feel part of it!


It hasn't been turned on or used for 20 years, so said the current owner.  It had alot of surface rust and dust from 2 decades of storage.  

The 80 year old motor is super heavy duty.  Even though it is only 1/3 HP, it weighs like 20 pounds.  It does start and spins, but the start cap is a bit weak, so I'll replace it.  The bearings sound pretty smooth.

Perhaps the coolest feature is that extra hand-crank on the right hand side of the machine.  It lifts the entire head.  Yes - rather than raising or lowering the table, this has a gear mechanism that raises/lowers the entire head/motor assembly.  Wow!

Another unique feature is this X/Y stage beneath the working table of the machine.  It's frozen solid, but it's very similar in construction to a lathe cross-feed of which I'm familiar with.  I'll get this working, too.

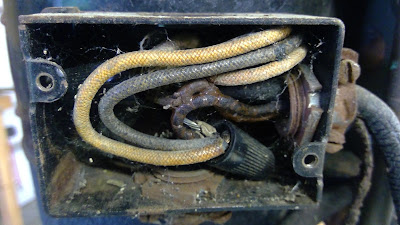
Wires on 80 year old machines are always in bad shape.
Check out this dry rot!

However, I was surprised to see color on the wiring within the junction box.  Usually those wires all fade to dull black and you can't tell what is yellow or green or red or black.

I blew off about 5 pounds of dust, and removed the on/off switch in order to see the original paint color below.  I plan to tear this down and give it the full restoration, so I wanted to see this original color.  

I usually try to always stick close to the OEM color, but I don't think I will in this case.  Olive green drab just doesn't strike me as a very snazzy color.  So I'm going off the rails and doing something I haven't done before:  I'm changing up the color scheme.  

I cleaned up a piece and tested out a color to see how well I like it.  
And I like it!  

This is Krylon Hammered Dark Bronze spray paint.  It has a hint of a sparkle and I think it looks really good.  It will compliment the future-polished pieces nicely.  I'm going to go with this.

Note:  I've used Rustoleum for years, and after years of a love/hate relationship with that brand, I'm ending that relationship on "hate".  I believe 50% of my spray cans get clogged up in the first few seconds of use.  I'm no idiot - I know how to paint and how to prep.  I feel Rustoleum has lost its quality.  I even called their customer service hotline to complain, and was given the standard corporate blow-off reply, so I'm switching to Krylon.  So far, so good.  I'm quite impressed!