Sunday, March 17, 2013

Bunk Bed Bliss

The kids have been begging to set up the bunk bed
ever since they found out I got one.  

Many weeks ago, a friend at work was kind enough to give me his home-made bunk bed that his two boys had grown up with.  I had it stored in the barn until this weekend when we decided to put it up.  It was quite a challenge, but after two days, it is finally all constructed.

Here's the final product as of late Sunday night.

There was only one injury, and that was when #3 Kiddo stumbled into an edge on the lower rail.  His temple really poofed up and looked kind of gruesome.  That stumble occurred Saturday morning, so it's a bit black and blue as of today.

To end, I'd like to give a  big thank you to my friend for his wonderful gift of this stout bunk bed.  We sure appreciate it!

Monday, March 11, 2013

Another Wood Project

This is the last piece of walnut I have from my friend.  
After too much thought and design work, I finally 
milled out this piece.  

It holds all my 1/4" drive socket set pieces....
- Ratchet
- Extension
- Universal Joint
- Metric and English sockets.

  It turned out pretty nicely.  


My new favorite finishing agent is Tung Oil.

Thursday, March 7, 2013

Driveshaft Adaptor

This is a post for a friend curious as to how I hooked up my new lawnmower engine to the existing drive shaft, and the related machining steps.

Step 1:
We start with a piece of iron given to me by Dad. 
I think this is a piece of steel scrap from a tandem anhydrous ammonia tank setup that failed.


Step 2:
Deck off the top for a known flat surface.  Also drill 4 holes with appropriate spacing for the existing driveshaft.


Step 3:
Bolt it down to the rotary table.


Step 4: 
Rough out the outside diameter.


Step 5:
Outside diameter finished


Step 6:
Cut a shallow relief for the backside protrusion on the existing driveshaft hub.


Step 7:
Drill and countersink the 4 holes that will connect to the hub on the new engine.


Step 8:
Here's the finished piece front and back


And this is how it all bolted together in sequence:

A:  Engine with keyed stub shaft 


B:  Install hub

C:  Install the adaptor


D:  Install the old drive shaft


Sunday, March 3, 2013

Scrap Wood

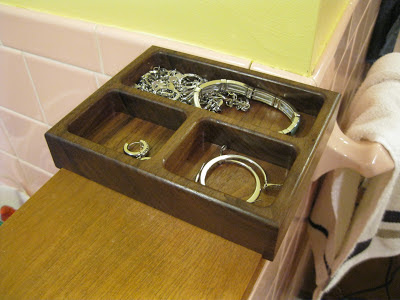
I had some scrap wood leftover from the "tool tote" project below.  I hate to just throw out a nice chunk of walnut wood, so I thought up this little accessory.

My better half is always placing her earrings and jewels on the little half-wall of the bathroom.  I fear one of the kids will yank her jewels over the edge and lose them forever.  This is the problem:


And this is my solution (at least I hope it solves the problem):

My walnut wood scrap turned into a little organizing dish.  
Notice the little edges that fit nicely over the edges of the half wall.